
Prepare for the Project
Always check with local authorities about permits and regulations. Your homeowners association may have requirements about changes to the outside of your home, so make sure to clear your plans with them before proceeding. Always wear protective eyewear when working with power tools.
1. Plan the Dimensions
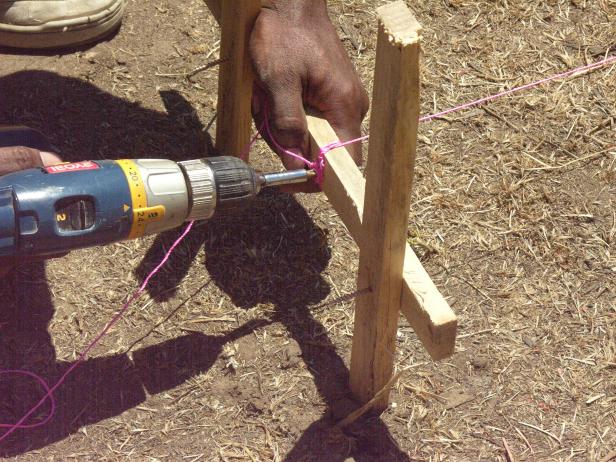
After measuring the dimensions of the yard, Adam helps center the placement of the deck using strings tied to wood stakes (Image 1). Continually measure and adjust the stakes until the strings form a square and level representation of the deck dimensions (Image 2).
2. Mark the Ground

Next, using bright spray paint and little orange flags, they mark the ground to represent the deck's four corners and midpoints. These markings indicate the placement of the deck's eight concrete support posts, called caissons.
3. Break Ground

Temporarily remove the stakes and string and then use a power auger to quickly bore 15-inch holes at the marked locations (Image 1). Remove any remaining dirt using a posthole digger (Image 2).
4. Form the Concrete

If the yard slopes slightly away from the house, the lower holes need extra height to reach the level string. To remedy this, cut a cardboard caisson tube to length and rest the segments on the lower holes. These now serve as concrete forms.
5. Pour Concrete

After mixing a batch of concrete, shovel it into the holes and lop off the excess using a spare wood stake (Image 1). Before allowing the concrete to cure for 48 hours, embed a J-bolt into each caisson (Image 2). Eventually, this will help tie down the deck.
6. Start the Deck Frame

Start by forming the perimeter and a center beam. After cutting several boards to length, screw treated lumber and redwood together to form double-thick perimeter boards. Because the center beam remains hidden, only use pressure-treated lumber. Nail on steel bracket ties to give lateral support (Image 1) and make both boards flush using an electric planer (Image 2).
7. Place the Main Boards

Keeping the more attractive redwood side out, fit the four perimeter boards onto anchor plates set on the caissons (Image 1). Later, these anchors help permanently tie the deck down. With the main boards in place, secure them together by nailing on corner brackets (Image 2).
8. Finish the Frame

With the perimeter complete, finish out the frame by installing treated joists. After installing steel joist hangers at 16-inch intervals, set in the joists and nail them in.
9. Install Decking Material

Having attached all the joists, finish up the deck by installing the decking material. To begin installation, start by squaring up the first piece of composite to the deck and attaching it to the underlying joists with composite decking screws (Image 1). Continue screwing down the decking making sure to allow for a 1/4" gap between each plank. Attach several rows and stagger the cut seams for structural and aesthetic value (Image 2).
10. Complete the Deck

To complete the deck, permanently fasten the wood portions to the caissons by bolting down the anchor brackets and driving in nails through the perimeter.
Are You Know?
Curious Traffic SignsHilarious Accessories For Your Dog
11 Weirdest Toilets and Urinals
How to Build a Deck: Design and Layout
Building a deck is the ultimate backyard DIY project. It takes some work, but this series of articles and videos shows you step-by-step instructions for each phase. The first step is to create a plan.
Tools & Materials
Tools
- Drill / Driver and Bits
- Hammer
- Tape Measure
- Long Level
- Line Level
- Shovel
- Wheelbarrow
- Work Gloves
- Eye Protection
- Hearing Protection
- Sod Cutter (Optional Rental)
Materials
- Furring Strips
- Exterior Wood Screws
- Landscape Stakes
- Mason Line
- Marking Paint
Planning for a New Deck
- Check with your local building department and homeowner's association regarding permits and building requirements. Note what elements of the project require inspection and plan your work accordingly.
- Call 811 to mark any underground utility lines.
- When planning size, make sure you'll have enough room for your outdoor furniture and that you'll have enough room to move around.
- Think about size in terms of the decking as well. Deck boards are typically 5-1/2 inches wide, so try to plan a deck size that won't leave narrow pieces at the ends.
- Create your design so that the railings are clear of windows and out-swinging doors.
- Once you have a basic layout, bring it to Lowe's to have an associate put together professional deck plans and a materials list.
Decking Materials
Pressure-treated lumber (top right) is the standard material to withstand weather. Most pressure-treated lumber is wet when delivered directly from the store, so you’ll need to let it dry before staining — typically for six months. As an alternative, consider upgrading the decking and railings with composite materials (bottom right).
Deck Construction
The basic deck construction for this project consists of:
- The foundation and 4 x 4 posts
- 2 x 10 beams
- 2 x 4 diagonal bracing
- 2 x 8 framing and joists
- 5/4-inch decking
- Stairs
- Railings
For larger decks, you can install parting boards — also called pattern boards — in the middle of the decking. These decking boards run perpendicular to the rest of the decking, creating an eye-catching design. They also allow you to use shorter deck boards and can eliminate the need to butt boards together to span the width of the deck.
You can eliminate some of the necessary posts by attaching a ledger board to your house, but it can cause problems later if not done right. It's a job usually best left for the pros. Our deck is freestanding, so it won't be attached to the house. A freestanding deck should be no more than one inch away from the house.
Marking the Deck Layout
When you have a solid plan, you can mark the layout with strings and batter boards made from 2-foot furring strips and screws.
1. Place the batter boards beyond the corners of your planned area. Tie strings to them marking the outer edges of your deck. Next to the house, drive stakes as close to the house as possible and tie strings to them.
2. Check that the strings are close to level. The layout is square when the diagonal measurements of the area are equal.
3. Adjust the strings as needed. Mark them in their final positions so you can take them off and put them back in the correct place.
4. Before marking for the posts, remove the sod if required by code. A sod cutter can make this job easier.
5. The post layout depends on the size of the beams, local building codes and your deck design. Measuring from the house, locate the post lines with additional batter boards and strings. Mark the post positions on the strings.
6. Mark the post hole locations on the ground with paint.
7. After you've laid out the posts, mark the height of the deck and posts on the house. The deck should be below the door threshold to keep water out of the house. Measure down the thickness of the decking plus the width of the joists and support beams. This notes the top of the posts. Mark a level line at this height along the house. Mark the width of the deck on the house as well to help you position the frame later.
Working with Pressure-Treated Lumber
Guidelines
- Use fasteners and hardware labeled for treated lumber — stainless-steel or hot-dipped, galvanized screws.
- If the lumber is wet — it typically is when delivered from the store — butt it together tightly when building. Pressure-treated wood shrinks as it dries.
- Drill pilot holes in the ends of boards to prevent splitting when you nail or screw them together.
- Use wood rated for ground contact when necessary for the project.
Safety
- Wear a dust mask and eye protection when handling or cutting wood.
- Wash your hands after working with treated wood.
- Dispose of sawdust and waste according to local regulations.
- Don't burn pressure-treated wood.
- Don't use pressure-treated wood as mulch.
0 Response to "How To Build A Deck"